

Here is the steps to make a Cailleach Peg Doll. Feel free to make your own doll simplifying these instructions such as using two sticks or if you'd rather not make a doll there is a paper doll version - see both the link at the bottom of the page and the downloadable template.
Intention
Intention is always my starting point in making a doll. It doesn't have to be a thought out plan, is can simply be a feeling, a vision for your doll inspired by an ancestral figure or perhaps some inspiration from the guided journey.
One reflection can be your own experience of walking the path towards crone, and your experience and reflection if you have arrived.
You might like to drawn some symbols on the wooden peg, which speak to your intentions.

Doll Making Materials
Peg doll making materials:
Needle, thread, pins and scissors and Scotch tape
Wooden clothes peg, bamboo Skewer
Hair - wool or yarn
Fabric:
Outer skirt fabric - Triangular shape, roughly ten inches wide, tapering to 5 inches in length
Underskirt fabric - Roughly 7 inches width, 6 inches long
Fabric for head/face - 5 inch square
Fabric for headscarf - 6 Inch square
Fabric for shawl - Long rectangle, roughly 4 inches wide and 6 inches long
Long thin strip of fabric for arms - half an inch wide,
Padding for head - wool or fabric

Doll Making Instructions
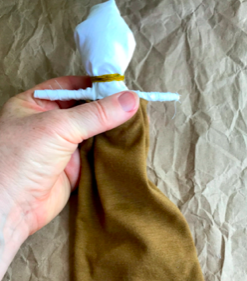
1. Creating the Arms and Head
Cut four inches from a bamboo skewer and place it in the space of the wooden peg creating the arms, secure by tying wool around the body and tie in a tight knot.
Cut a section of bamboo skewer four inches long, add it to the peg, secure in place with yarn - wrapping it in both directions diagonally
Beginning at one end of the arm, use a piece of Scotch tape to secure the fabric then begin winding the fabric along the arm, go diagonally across the body (to help secure it) - along the other end of the arm and then back to the centre of the body - then sew to keep in place.


Add some wool or fabric to pad the head to give it shape, sew in place
Fold the square of fabric over the head then tuck both sides so they meet in the middle and then sew

Secure with a piece of yarn or embroidery thread

2. Creating the Skirts
Take the piece of fabric your going to use for the underskirt. Turn over one inch of fabric creating a waistband, pin in place and sew (don't worry how your sewing looks, this won't show)
Create an overlay of fabric, this is going to be your 'dart' to gather the fabric and create more body for your doll, giving her more body

Create a second dart and pin them in place
Sew through both layers of fabric before attaching to the doll
Sew the skirt onto the doll (the lower pieces of your head fabric)
Creating the Main Skirt


Fold the edge of the fabric over creating a waistband, roughly a half inch, as you did with the underskirt, then sew
Double over the fabric, like you did with the underskirt, creating a dart. Pin it in place and sew, then sew the main skirt fabric onto the doll
Arrange the fabric at the back to your liking, sew in place if required

3. Sewing the Hair and Headscarf
Position the wool, or yarn for her hair, and sew it on
Turn the doll over, sew the hair around the edge of the head
You can either tie the headscarf ends if they are long enough of just sew them into position

4. Finishing - Headscarf, Waistband and Embellishments
Position the shawl fabric from the back, then arrange onto the body in a crisscross style and then sew in place.
Sew down the back of the headscarf in place.
At this point you could add any embellishments - you could use jewelry from relatives or friends who have died, which is a great way to honor them.
Finishing Your Doll
Now that your doll is complete it's up to you how you bring her into being.